資訊安全與管控
nmap使用指令
使用詳細輸出
nmap -v www.hinet.netnmap -A ip或網址(可以分析各port的可能系統與使用服務,會很久)EX:使用-A -Pn的結果
nmap -A -Pn {IP}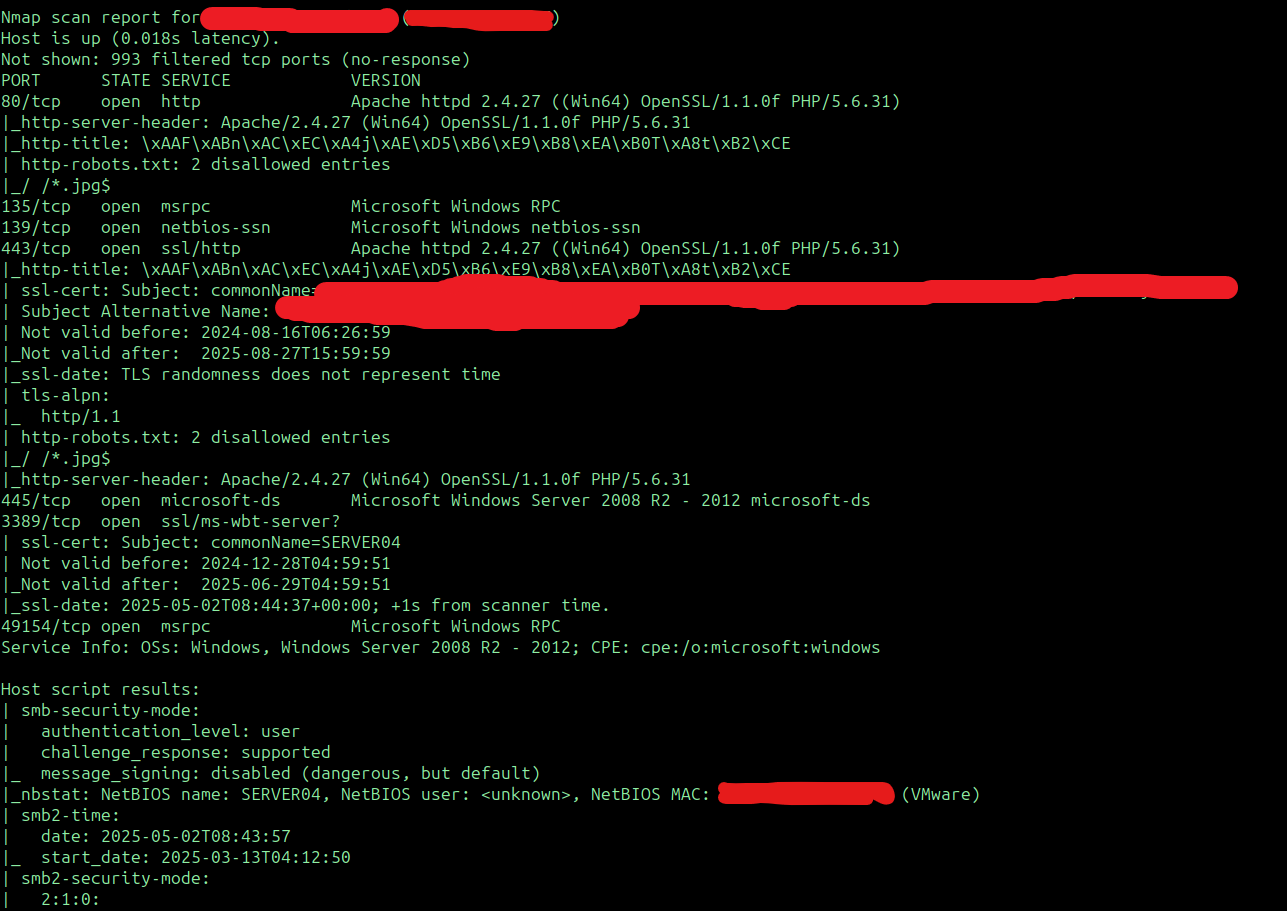
排除主機
nmap 192.168.0.* --exclude 192.168.0.100使用排除名單
nmap -iL hostlist.txt --excludefile excludelist.txt檢測是否有使用防火牆(不會完成3手交握)
nmap -sA scanme.nmap.org掃描有防火牆的主機
nmap -PN scanme.nmap.org偵測主機是否開機(ping scan)
nmap -sP 140.115.35.0/24nmap -F www.hinet.net
#快速掃描 也可以使用-T5,預設-T3 按照port做掃描
nmap -p 80,443 192.168.1.1
nmap -p 80-200 192.168.1.1
使用tcp掃描
nmap -p T:80 192.168.1.1使用udp掃描
nmap -p U:53 192.168.1.1最常用的10port
nmap --top-ports 10 192.168.1.1綜合掃描
nmap -sS -P0 -sV -O 192.168.56.102
param:
-sS: Scan Syn
-sV: Determine OS Version
-P0: Protocol Scan
-O : Operation System
script scan
SCRIPT SCAN:
  -sC: equivalent to --script=default
  --script=<Lua scripts>: <Lua scripts> is a comma separated list of
           directories, script-files or script-categories
  --script-args=<n1=v1,[n2=v2,...]>: provide arguments to scripts
  --script-args-file=filename: provide NSE script args in a file
  --script-trace: Show all data sent and received
  --script-updatedb: Update the script database.
  --script-help=<Lua scripts>: Show help about scripts.
           <Lua scripts> is a comma-separated list of script-files or
           script-categories.
驗證所有使用的TLS版本
nmap --script ssl-enum-ciphers -p 443 {url}如果要驗證整個網段,可以先產生出txt檔。比如10.0.0.0/16的tls
echo 10.0.{1..254}.{1..254} >> iplist.txt建立一個sh檔(此例子只檢查tls1.0-1.如需要檢查不一樣的加密方式可以自行增減)
#!/bin/bash

IPLIST=($(cat iplist.txt))
TLS_VER=(TLSv1.0 TLSv1.1 TLSv1.2)
SCAN_PORT="443"
NMAP_OPS="--host-timeout 3000ms --max-rtt-timeout 3000ms --script ssl-enum-ciphers -p ${SCAN_PORT}"
OUTPUT="output.csv"

for (( i = 0; i < ${#IPLIST[@]}; i++ )); do
  SUP_TLS=$(nmap $NMAP_OPS ${IPLIST[i]} | egrep "${TLS_VER[0]}|${TLS_VER[1]}|${TLS_VER[2]}" | cut -c 5-11)

  if [[ ! -z $SUP_TLS ]]; then
    echo -ne "\n${IPLIST[i]}" >> $OUTPUT

    for (( j = 0; j < ${#SUP_TLS[@]}; j++ )); do
      echo -n ",${SUP_TLS[@]}" >> $OUTPUT
    done
  fi

  unset SUP_TLS
done
參考網址
用 nmap 驗證支援的 TLS 版本和 Ciphers(Mr.沙先生)
OPENVAS(GVM) 使用說明
openvas安裝
使用Kali安裝
sudo apt install gvm備註:其他linux版本請參閱官方安裝文件
https://greenbone.github.io/docs/latest/22.4/source-build/index.html
人家整理好的debian快速安裝方式
https://github.com/Kastervo/OpenVAS-Installation
初始化gvm
sudo gvm-setup備註:完成後會自動產生新密碼,如果忘記可用以下指令修改。
sudo runuser -u _gvm -- gvmd --user=admin --new-password=password檢查安裝
sudo gvm-check-setup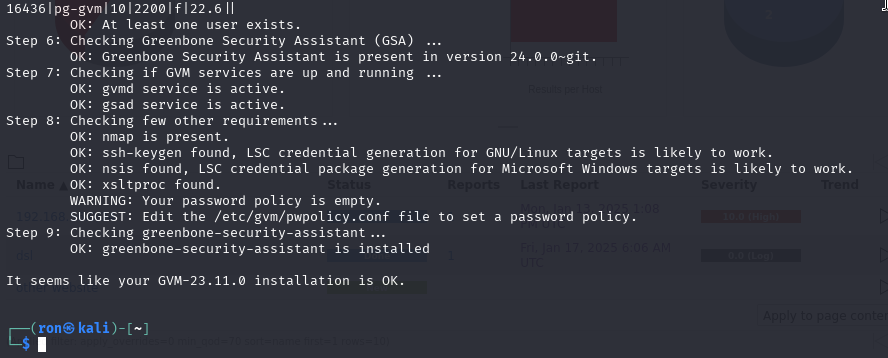
最後會出現It seems like your GVM-xx.xx.xx installation is OK.代表有安裝完成。
啟用gvm
sudo gvm-start備註:這個程式會自動開啟gsad(GreenBone Security Assistant daemon)、gvmd(greenbone Vulnerability Manager daemon)跟opsd-openvas三個服務,完成後也會自動開啟遊覽器。
注意!!第一次啟用gvm後要等程式將資料完整的寫到資料庫後才可以正常運作,需要時間是電腦效能可能幾十分鐘到幾小時。
預設網址:https://127.0.0.1:9392
停止gvm
sudo gvm-stop修改服務IP跟Port
sudo vi /usr/lib/systemd/system/gasd.service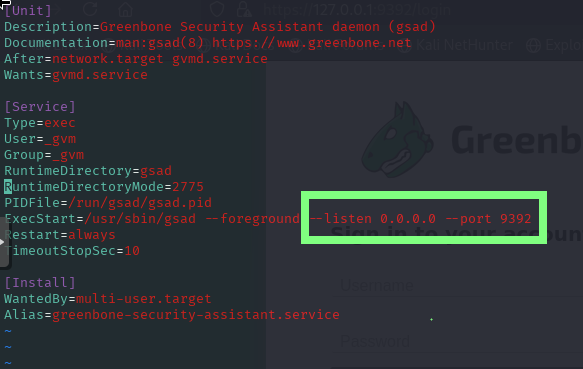
將--listen 更改成新的服務ip,也可以使用0.0.0.0做任意 IP都可以,--port則可以更改成想要的port,完成厚重啟服務。
更新資料庫
sudo greenbone-feed-sync也可以
sudo greenbone-feed-sync --type nvt
sudo greenbone-feed-sync --type scap
sudo greenbone-feed-sync --type cert
備註:也可以使用cron讓資料庫定期更新。
重置GVM
sudo -u _gvm gvmd --rebuild-gvmd-data=all其他
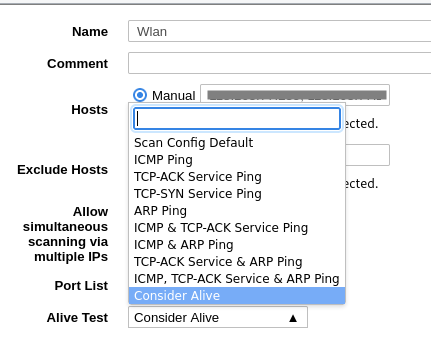
如果安裝openvas的裝置使用外部ip直接對其他實體(外部)ip做弱點掃描時會出現掃不出任何結果的狀況時,
將Alive Test從scan config Default改成Consider Alive就可以了。
更新後啟動失敗問題處理1(Database is wrong Version)
顯示狀態如下
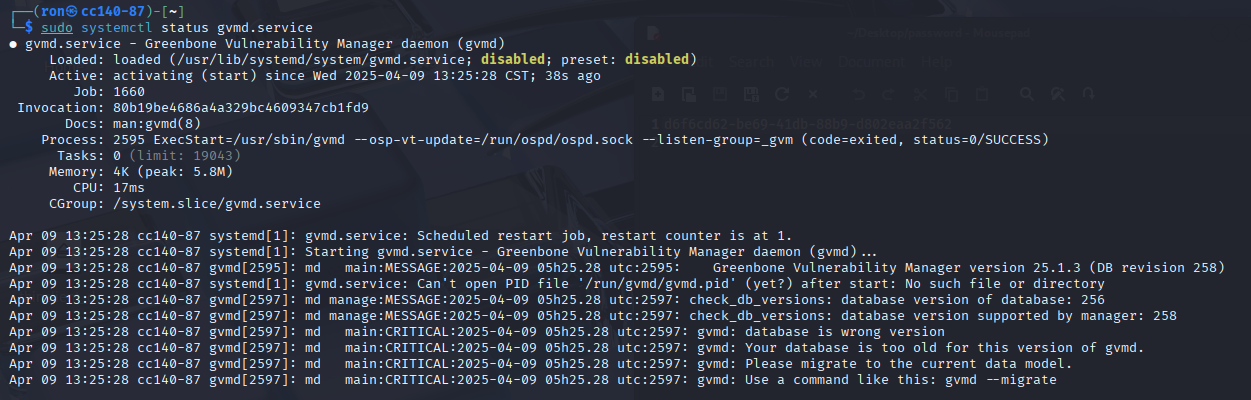
使用
gvmd --migrate顯示如下,role "root" does not exist。

使用
gvm-setup solve,縣市概略如下
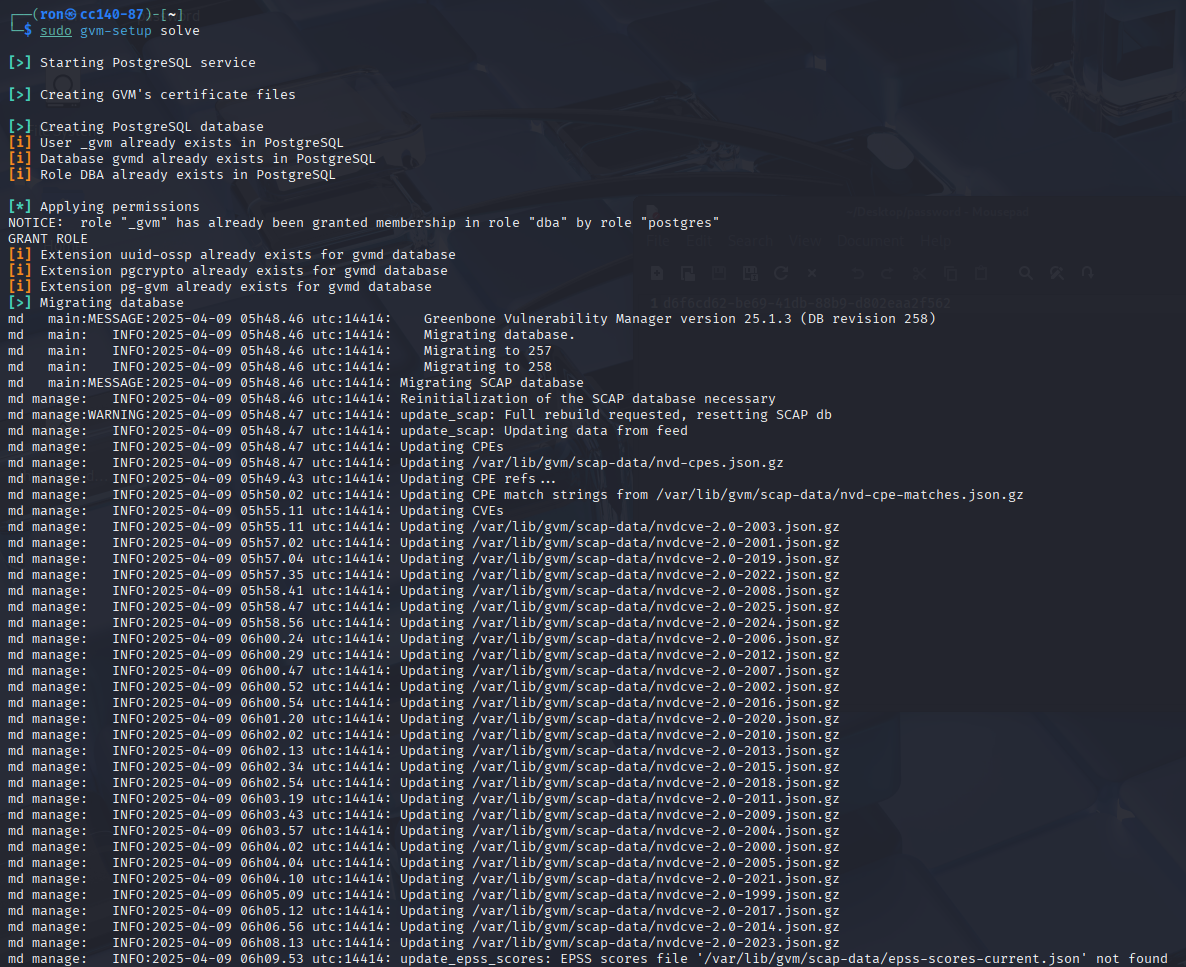
很多以下略,
然後啟動gvm就可以成功,發現是因為更版所致。
參考資料
https://greenbone.github.io/docs/latest/22.4/kali/index.html
https://www.greenbone.net/en/documents/
https://forum.greenbone.net/t/your-database-is-too-old-for-this-version-of-gvmd/20812
簡易工具與指令
nslookup
可以查詢網域所對應的ip
nslookup 2022.4inlibra.com {可指定使用的dns}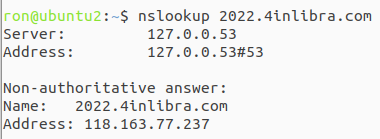
whois
可以得知域名註冊、Dns伺服器等相關資訊
whatweb
除網域登記者、ip等等網域資料外,還有網站的相關內容分析,如使用何種語言、網頁伺服器還有版本等等
暴力密碼破解工具
crowbar
安裝(kali)
sudo apt install crowbar使用方式
crowbar -b {ssh,ftp...} -u {username} -c {password} -n {session number} -l {logfile}
#-u可以改成-U 用使用者txt名單,-c也可以變成-C 使用密碼txt名單
備註:注意如果只掃一個ip也要輸入/32,不然會顯示錯誤。